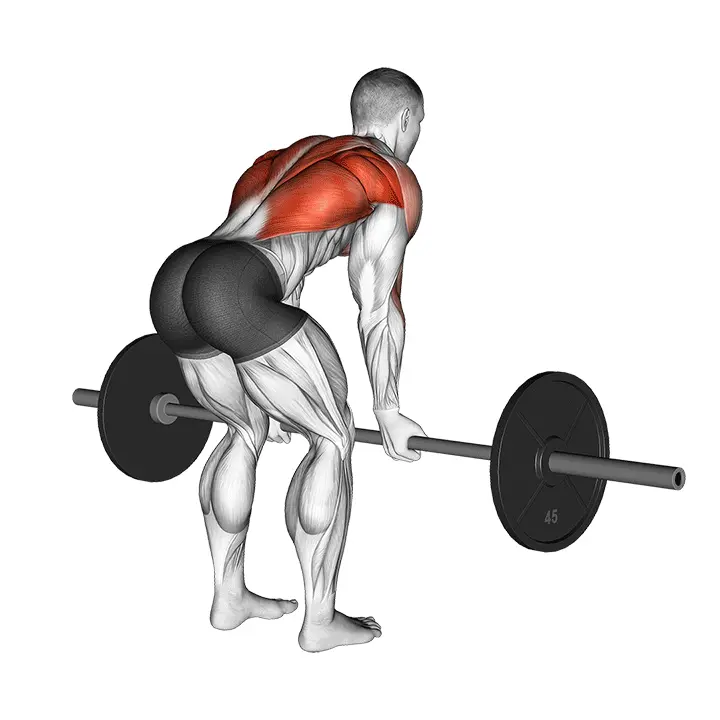
Barbell Reverse Grip Bent Over Row
The bent-over row with a reverse grip emphasizes the upper back and allows the elbows to stay close to the sides, enhancing the feel of the movement in the mid-back and biceps. The 'Back Fix' principle emphasizes a neutral spine, hip hinge, and scapular control to keep the lower back safe and ensure the pull targets the back muscles correctly.
AI Analysis
Required equipment
Why Barbell Reverse Grip Bent Over Row?
The barbell bent-over row with a reverse grip is an excellent strength exercise that effectively targets the upper back muscles, particularly between the shoulder blades and the latissimus dorsi. The reverse grip (palms facing you) adds a unique twist to this classic row: it significantly activates the biceps and allows the elbows to be kept closer to the body. This, in turn, enhances the feel in the mid-back and lower traps, giving the back thickness and strength. This movement is particularly suitable for intermediate and advanced fitness enthusiasts looking to develop their back muscle mass and strength in a versatile manner. It is also a great addition for those seeking new ways to stimulate the biceps and improve pulling strength. The barbell allows for the use of relatively heavy weights, which is key in building muscle hypertrophy and strength. Proper technique is crucial in this movement to ensure the safety of the lower back and optimal muscle activation. The 'Back Fix' principle emphasizes a neutral spine, where the lower back does not round or excessively arch. The movement begins by hinging at the hips while keeping the back straight and the chest proud; the upper body should be at an angle of about 45-70 degrees from the floor depending on your mobility and lower back feel. Controlled movement of the shoulder blades – squeezing them together at the top of the pull – ensures that the work truly targets the back muscles rather than, for example, the shoulders. This makes the movement extremely effective and safe, as long as the technique is mastered. When done regularly, it helps improve posture, increase functional strength, and build an impressive, strong back.
Benefits
Effectively strengthens the upper back muscles.
Develops bicep strength and size.
Improves posture and body control.
Increases pulling strength and functional strength.
Activates the mid-back more deeply.
Helps prevent lower back pain.
Muscle groups
Primary
- upper-back10
- upper-back10
- trapezius8
- trapezius8
Secondary
- biceps7
- biceps7
- deltoids5
- deltoids5
Stabilizers
- lower-back6
- abs5
- gluteal5
- gluteal5
- hamstring4
- hamstring4
- forearm6
- forearm6
How to perform
Setup
- Load the barbell with appropriate weights and place it on the floor in front of your feet.
- Set your feet hip-to-shoulder-width apart, with knees slightly bent.
- Hinge at the hips, keeping your back neutral and chest proud; your upper body should be at an angle of about 45-70 degrees from the floor depending on your mobility and lower back feel. Take a shoulder-width reverse (supinated) grip on the bar – palms facing forward/upward, thumbs around the bar.
Execution
- Before the pull, engage your core, pulling your shoulder blades slightly back and down (pack the shoulders).
- Pull the bar towards your lower abdomen/navel area, keeping your elbows close to your sides.
- Pause briefly at the top position and squeeze your shoulder blades together, feeling the upper back working. Lower the bar under control to almost straight arms while maintaining scapular control and a neutral back. Repeat the prescribed number of repetitions while maintaining the same body angle and tight core.
Coaching cues
- •Keep your back neutral throughout the movement; gaze at the floor a few meters ahead, neck long.
- •Pull the bar towards your lower abdomen, not your chest – this keeps the elbows by your sides and engages the upper back. Distribute your weight evenly across the entire foot and push your hips slightly back (hip hinge), do not round your lower back. Inhale before the pull, exhale as you pull the bar up. If your lower back fatigues or your posture breaks down, lighten the load or raise your upper body angle slightly. Use a shoulder-width, firm reverse grip; squeeze the bar, but avoid overextending the forearms and biceps – feel the movement in the upper back.
Common mistakes
❌ Rounded lower back
Why it's wrong: Rounding the lower back puts stress on the vertebrae and can lead to serious injuries, such as herniated discs.
✓ Fix: Keep your back neutral and straight throughout the movement. Focus on hinging at the hips, not the lower back.
❌ Excessive body swinging
Why it's wrong: Excessive body swinging reduces the load on the target muscles and shifts the work to momentum, diminishing the effectiveness of the movement.
✓ Fix: Choose a lighter weight, focus on controlled movement, and feel the muscles working. The body should remain as stable as possible.
❌ Elbows far from the body
Why it's wrong: If the elbows flare out too much, the pressure shifts to the shoulders and reduces activation of the muscles between the shoulder blades.
✓ Fix: Keep your elbows close to your sides throughout the movement. Focus on pulling the bar towards your navel, squeezing the shoulder blades together.
Frequently asked questions
What is the difference between the bent-over row with a reverse grip and a pronated grip?
The reverse grip (palms up) emphasizes the biceps and mid-back more, allowing the elbows to stay closer to the sides. The pronated grip (palms down) activates the upper back and traps more. Both are excellent movements but offer slightly different muscle activation. The choice depends on personal goals and feel.
Can the movement be done without a barbell?
Yes, a similar movement can be done with dumbbells (dumbbell row), allowing both arms to move independently or alternately. Cable rows also provide a similar pulling motion. However, the barbell generally allows for heavier weights and symmetrical loading on both sides.
How far should I lean forward?
Aim for about a 45-degree angle between your body and the floor, or even slightly more horizontal. The key is to keep your back straight and neutral throughout the movement. If your lower back rounds or your technique suffers, lean less or use a lighter weight. The safety of your back is paramount.
Why does my lower back hurt during this movement?
The most common reason is a rounded lower back or too much weight forcing the back to curve. Ensure you keep your back neutral and hinge at the hips. Weak core support may also be a factor. Focus on core activation and start with lighter weights. If pain persists, check your technique with a professional.
Safety tips
- Keep your back neutral and straight throughout the movement to avoid lower back injuries.
- Always start with light weights to practice proper technique before adding load.
- Avoid excessive body swinging; controlled movement is key to effective muscle stimulation.
- Use a lifting belt if necessary during heavier sets to support the lower back and core.
- Ensure adequate warm-up before heavy sets and cool down after the workout.
Tags

Train smarter with AI coaching
Tsemppi's AI gives you exact weights and reps for every workout. Progress every single session.
Start your free 7-day trial✨ Limited spots available • No credit card required