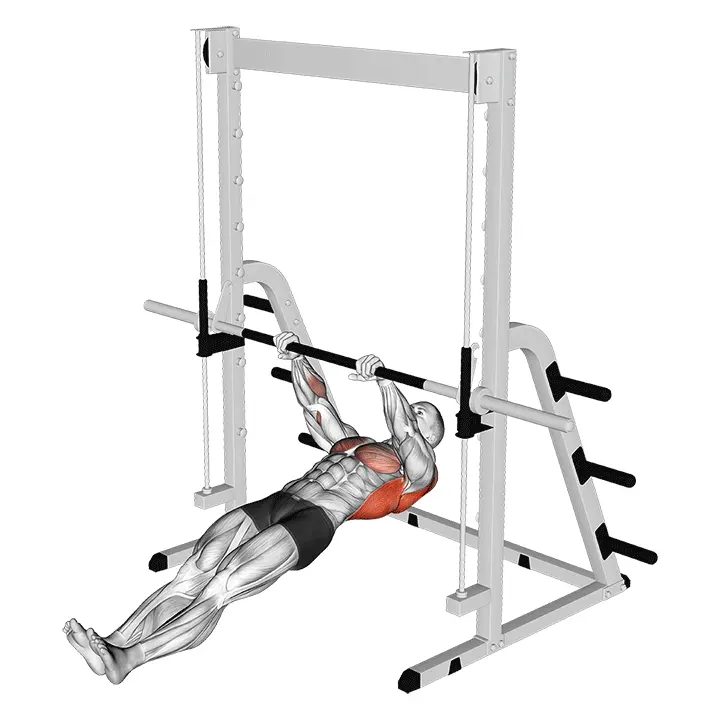
Inverted Row
Inverted Row is a bodyweight horizontal row that focuses on scapular control and upper back activation. The movement strengthens the upper back, improves posture, and teaches pulling with the shoulder blades before the arms.
AI Analysis
Required equipment
Why Inverted Row?
The Inverted Row is an excellent bodyweight exercise designed specifically to develop strength and control in the upper back and shoulder blades. This movement is perfect for beginners who want to strengthen their back muscles and improve their posture without heavy weights. It is also an effective way to learn to pull with the shoulder blades before the arms, which is a critical skill in many other pulling movements, such as pull-ups. The basic idea of the movement is simple: you lie on your back under a bar or similar support and pull yourself up until your chest touches the bar, actively focusing on squeezing the shoulder blades together. The Inverted Row helps correct posture problems caused by today's sedentary work, strengthening those muscles that often remain weak while the chest muscles dominate. It effectively activates the scapular retractors, different parts of the trapezius, and biceps, while teaching body control and coordination. Why is this movement so effective? It allows for easy adjustment of the load by changing the angle of the body: the more upright you are, the easier it is, and the more horizontal you are, the more challenging it becomes. This makes it highly scalable and suitable for fitness enthusiasts of all levels, but especially for beginners who are building foundational strength. When performed regularly, the Inverted Row improves shoulder health, reduces back pain, and gives you a stronger, more upright appearance. It is a fundamental movement that belongs in every training program aiming for overall body control and functional strength.
Benefits
Effectively strengthens the upper back muscles.
Improves posture and body control.
Teaches controlled movement of the shoulder blades.
Reduces shoulder and back pain.
Develops pulling strength without heavy weights.
Easily scalable for different fitness levels.
Increases overall body functionality.
Muscle groups
Primary
- upper-back10
- upper-back10
- trapezius9
- trapezius9
Secondary
- biceps7
- biceps7
- deltoids5
- deltoids5
- forearm4
- forearm4
Stabilizers
- abs6
- lower-back3
- gluteal4
- gluteal4
- hamstring3
- hamstring3
How to perform
Setup
- Set the bar in a rack at about waist to chest height or attach rings/suspension straps at a similar height.
- Take a shoulder-width or wider underhand grip on the bar/handles, arms straight.
- Step under the bar, straighten your body from heels to crown (ribs down, glutes and core tight). Heels on the ground, body straight like a plank.
Execution
- Start the movement from the shoulder blades: pull the shoulder blades down and together first (depression + retraction) without bending the elbows.
- Continue by pulling the elbows towards your sides, bringing your sternum towards the bar/handles while keeping your body in a straight line.
- Pause briefly at the top position, feel the support in your upper back and shoulder blades, with elbows at about a 30-45° angle from your sides.
Coaching cues
- •Start the pull with the shoulder blades, not the elbows.
- •Keep your ribs down, core engaged, and glutes activated – the body remains in a plank throughout the movement.
Common mistakes
❌ Hips sagging down or rising too high.
Why it's wrong: This is due to weak core activation or excessive assistance from the legs. It unevenly loads the spine and reduces upper back engagement.
✓ Fix: Engage your abdominal muscles and squeeze your glutes throughout the movement, keeping your body straight like a plank. Imagine a straight line from your heels to your shoulders.
❌ Pulling with the arms first instead of the shoulder blades.
Why it's wrong: The movement becomes bicep-dominant, and the upper back does not receive optimal stimulation. This is a common mistake that prevents effective activation of the back muscles.
✓ Fix: Start the movement by pulling the shoulder blades together and down, as if trying to squeeze a pencil between them. The arms follow only after this.
❌ Shoulders rising towards the ears during the movement.
Why it's wrong: Shoulder elevation can cause tension in the neck and upper back, and reduce activation of the scapular retractors. It often indicates that the movement is too challenging or the technique is poor.
✓ Fix: Keep your shoulders down and relaxed, away from your ears. Focus on pulling your chest towards the bar while stabilizing your shoulders.
Frequently asked questions
How often should I include the Inverted Row in my training program?
As a beginner, you can perform the Inverted Row 2-3 times a week as part of a full-body workout or upper body workout. As you progress, you can adjust the frequency based on your goals, for example, 1-2 times a week as part of strength training. Remember to give your muscles enough time to recover.
How can I make the Inverted Row harder or easier?
You can increase difficulty by lowering the bar or changing the position of your legs, bringing your body closer to horizontal. You can also elevate your feet on a platform or add extra weight on your chest. To make it easier, raise the bar higher or bend your knees and keep your feet firmly on the ground.
Do I need special equipment for the Inverted Row at home?
Not necessarily. While a bar is ideal, you can also use a sturdy table that you can fit under, or gymnastic rings or suspension straps that can be attached to a door frame or sturdy beam. The most important thing is to find a stable support from which you can pull yourself up.
Which muscles does the Inverted Row primarily target?
The Inverted Row primarily targets the upper back muscles, such as the latissimus dorsi, different parts of the trapezius, and the rhomboids. The biceps and forearms also work strongly, and the core has to stabilize the movement.
Safety tips
- Start light and focus on technique: Ensure you master the movement form completely before adding difficulty or repetitions.
- Keep your body straight: Avoid letting your hips sag or arching your back. Engage your core to keep your body in a plank position.
- Listen to your body: If you feel pain in your shoulders, neck, or lower back, stop the movement and check your technique. Lighten the movement if necessary.
- Ensure equipment stability: Use only sturdy bars, racks, or rings that can support your weight. Test their stability before starting the exercise.
- Breathe correctly: Exhale as you pull yourself up and inhale as you lower yourself down. Steady breathing helps maintain focus and body control.
Tags

Train smarter with AI coaching
Tsemppi's AI gives you exact weights and reps for every workout. Progress every single session.
Start your free 7-day trial✨ Limited spots available • No credit card required