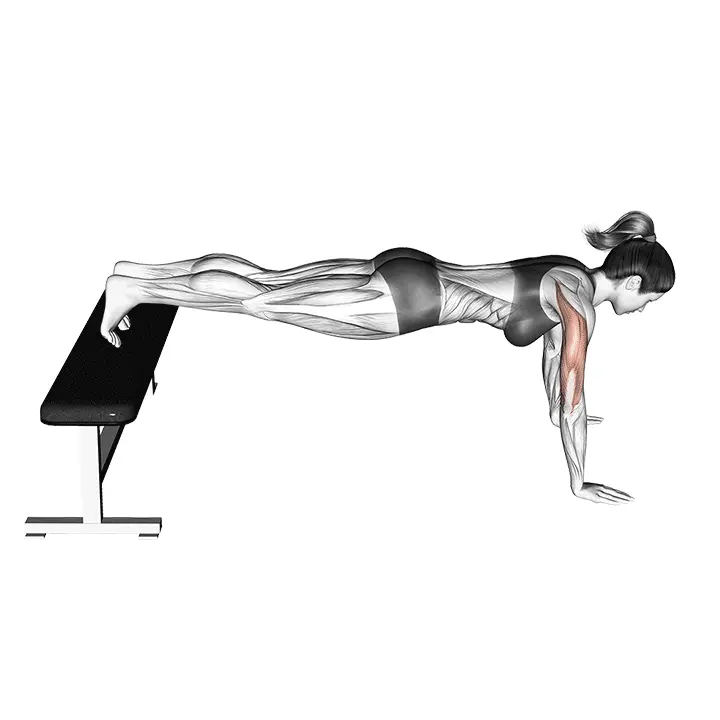
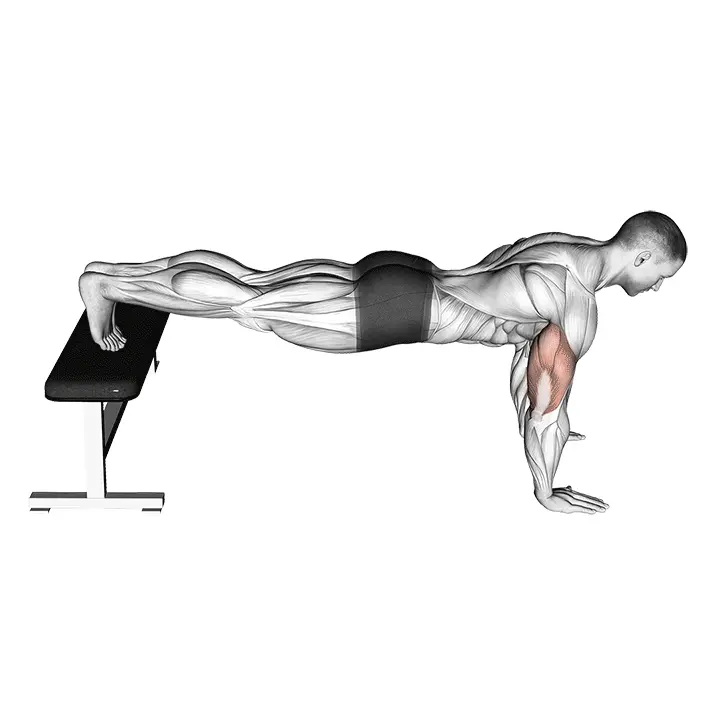
Decline Push Up
Decline push up (push up with feet elevated) particularly targets the upper chest, front shoulders, and triceps. The movement develops upper body pushing strength and core control, as the body remains plank-like. The difficulty level can be adjusted by changing the height of the platform.
AI Analysis
Required equipment
Why Decline Push Up?
The decline push up is an excellent and effective bodyweight exercise that specifically targets the upper chest, front shoulders, and triceps. It is a great way to develop upper body pushing strength while also challenging core control, as the body must remain tight and plank-like throughout the movement. This exercise is particularly effective because it changes the angle of the traditional push up and loads the upper part of the chest differently, helping to create a fuller and stronger upper chest. In addition to aesthetic benefits, it improves functional strength, which is useful in many daily tasks and athletic performances. The decline push up is well-suited for intermediate fitness enthusiasts who have already mastered the basic push up and are looking for new challenges in upper body training. More advanced practitioners can also benefit from this movement by adding resistance, such as a weighted vest or a higher platform. The difficulty level of the movement is easy to adjust: the higher you place your feet, the more of your body weight is directed towards the chest and shoulders, making the movement more challenging. This makes it a versatile option for both home workouts and gym sessions, as the equipment needed usually consists of a bench, box, stairs, or another stable platform. Keeping the core tight is key to prevent strain on the lower back and to ensure maximum stimulation of the chest muscles. When performed correctly, the decline push up is a safe and highly rewarding exercise that helps you build a solid and powerful upper body.
Benefits
Effectively strengthens the upper chest.
Develops upper body pushing strength.
Improves strength in shoulders and triceps.
Increases core control and stability.
Shapes the chest muscles in a versatile way.
Well-suited for home workouts.
Reduces the risk of injury when done correctly.
Muscle groups
Primary
- chest10
- chest10
Secondary
- deltoids7
- deltoids7
- triceps7
- triceps7
Stabilizers
- abs6
- obliques5
- obliques5
- lower-back5
- upper-back4
- upper-back4
- trapezius4
- trapezius4
- gluteal4
- gluteal4
- quadriceps3
- quadriceps3
- calves2
- calves2
- forearm3
- forearm3
How to perform
Setup
- Place your feet firmly on the platform (bench/box) and hands on the floor slightly wider than shoulder-width.
- Position your wrists under your forearms, fingers pointing forward, and keep your body straight from the crown of your head to your heels.
- Engage your core, glutes, and thighs; pull your shoulder blades gently down and back.
Execution
- Inhale and lower yourself in a controlled manner until your chest is 2–5 cm from the floor; keep your elbows at about 30–45° from your body.
- Maintain the plank position without sagging your lower back or letting your pelvis drop; keep your neck neutral.
- Press your palms into the floor and push back up to straight arms; protract your shoulder blades slightly at the top position and exhale.
- Repeat the prescribed number of repetitions in a controlled manner.
Coaching cues
- •Body as one plank – do not let your hips sag.
- •Screw your hands into the floor: elbows forward and upper arms externally rotated (stabilizes the shoulders).
Common mistakes
❌ Lower back sagging or back rounding
Why it's wrong: Core support fails, which unnecessarily strains the back and reduces the effectiveness of the movement on the chest muscles. Incorrect posture can lead to pain.
✓ Fix: Engage your abdominal muscles and glutes to keep your body straight like a plank throughout the movement. Focus on keeping your ribs down and pelvis neutral.
❌ Elbows pointing too far out to the sides
Why it's wrong: This places undue stress on the shoulder joint and can lead to pain or injury. The movement also does not effectively target the upper chest.
✓ Fix: Keep your elbows slightly close to your body, at about a 45-degree angle. Imagine pushing your hands down and forward while keeping your shoulders down.
❌ Short range of motion
Why it's wrong: If the movement is performed with too short a range of motion, the chest muscles do not get fully stretched and contracted, limiting development and effectiveness.
✓ Fix: Lower yourself down until your chest is almost at floor level or you feel a good stretch in the chest muscles. Push yourself back up until your arms are nearly straight.
Frequently asked questions
How do I adjust the difficulty level of the decline push up?
You can adjust the difficulty level by changing the height of the platform. The higher your feet are, the harder the movement becomes, as a greater portion of your body weight is directed towards the chest and shoulders. Start with a low platform and increase the height as your strength improves and your technique is mastered.
Can I do decline push ups if I have shoulder pain?
If you have shoulder pain, it is advisable to consult a physiotherapist or doctor before starting the movement. The exercise places stress on the shoulders, and incorrect technique or too much load can worsen the pain. Start with lighter variations and ensure a pain-free range of motion.
Do I need special equipment for decline push ups?
You do not need special equipment. You can use any stable and sufficiently high platform for your feet, such as a bench, box, stairs, or even a sturdy chair. A gym mat can add comfort under your hands, but it is not essential.
What is the difference between decline and incline push ups?
In a decline push up, the feet are elevated, which places more load on the upper chest and front shoulders. In an incline push up, the hands are elevated, making the movement easier and targeting the lower chest and abdominal muscles more. They are mirror images of each other.
Safety tips
- Ensure that the platform is stable and does not slip during the movement. Test its sturdiness before starting the exercise.
- Always start with a lighter variation to ensure proper technique before increasing the difficulty level. Technique is always a priority.
- Listen to your body – if you feel pain in your shoulders, wrists, or lower back, stop the movement and check your technique or rest.
- Keep your gaze slightly forward or down to maintain a neutral neck position and avoid unnecessary tension.
- Do not let your hips sag or your back round; keep your body tight and plank-like throughout the performance. Engage your core.
Tags
Train smarter with AI coaching
Tsemppi's AI gives you exact weights and reps for every workout. Progress every single session.
Start your free 7-day trial✨ Limited spots available • No credit card required