Decline Push Up M
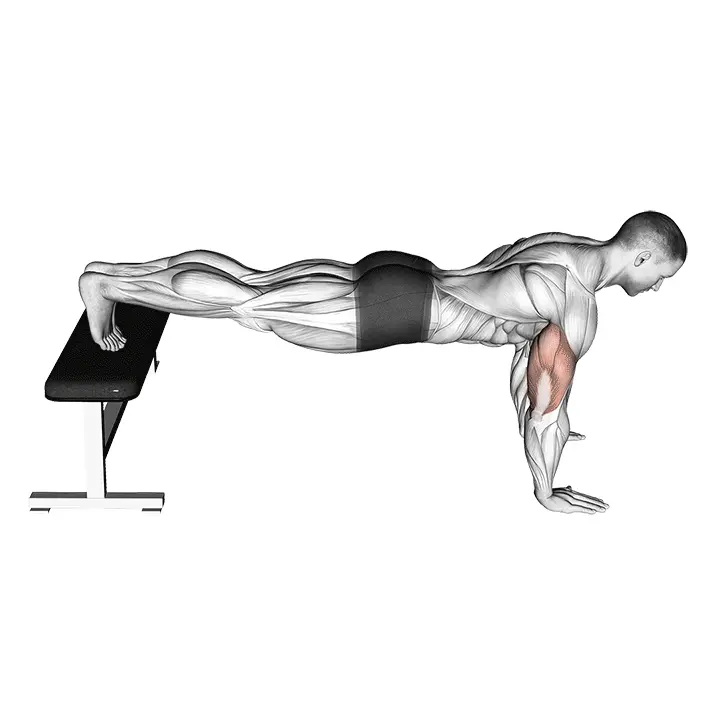
Decline push-up (feet elevated) targets the chest, especially the upper part, and increases the need for shoulder and core stabilization. The movement is an effective bodyweight pushing exercise that develops strength and control without additional weights.
AI Analysis
Required equipment
Why Decline Push Up M?
Decline push-up is an excellent bodyweight exercise that effectively targets the upper chest muscles. By placing your feet on an elevated surface, such as a bench or a sturdy box, the angle of the body changes so that the upper body has to work harder to activate the upper chest. This makes the movement an excellent option for those who want to develop their upper chest without gym equipment or additional weights. The movement not only strengthens the chest muscles but also challenges the shoulders and requires significant core stability. Controlling the body in this position simultaneously develops strength, coordination, and body control. It is well-suited for intermediate fitness enthusiasts who have already mastered the basic push-up and are looking for new ways to challenge themselves. More advanced trainers can also incorporate this movement into a diverse training program. Decline push-up is effective because it alters the mechanics of the traditional push-up, forcing the upper body to work at a steeper angle. This mimics the benefits of an incline bench press but uses only body weight. When performed regularly, it helps build solid upper body strength and improve posture while developing muscular endurance and explosive power. It is a versatile and functional movement that supports many pushing movements required in daily life and sports.
Benefits
Effectively develops the upper chest.
Strengthens shoulders and arms.
Increases core stability.
Improves body control and coordination.
Builds strength without additional weights.
Shapes chest muscles in a versatile manner.
Suitable for various fitness levels.
Muscle groups
Primary
- chest10
- chest10
Secondary
- deltoids7
- deltoids7
- triceps7
- triceps7
Stabilizers
- abs6
- gluteal4
- gluteal4
- upper-back4
- upper-back4
How to perform
Setup
- Place a bench or sturdy platform behind you for your feet.
- Position your hands on the ground slightly wider than shoulder-width, fingers pointing forward and forearms vertical.
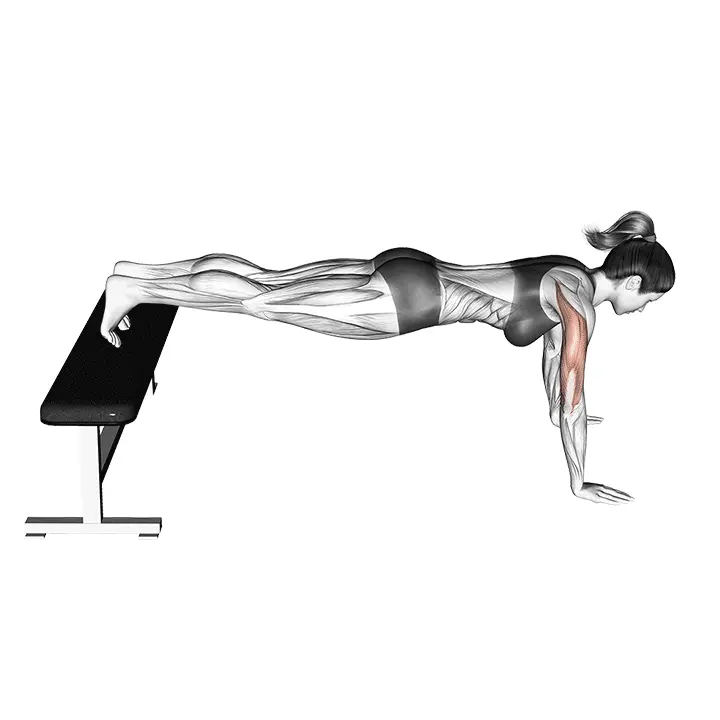
- Elevate your feet onto the platform and align your body straight from head to heels, keeping your hips neutral (neither sagging nor rounding).
Execution
- Engage your core and glutes, inhale, and lower yourself slowly towards the ground with elbows at about a 45-degree angle from your body.
- Stop when your chest is close to the ground and your shoulder blades have retracted slightly back/down.
- Push against the ground with your palms, extend your elbows, and rise back up, exhaling during the movement and pushing your chest away from the floor (slight protraction of the shoulder blades at the top position).
Coaching cues
- •Keep your body in a straight line – engage your sides, glutes, and abdominal muscles throughout the set.
- •Direct your elbows about 30–45 degrees to the side, avoiding excessive flaring or locking of the elbows at the top position.
Common mistakes
❌ Hips sagging or rising too much
Why it's wrong: This indicates weakness or lack of control in the core. It puts unhealthy strain on the spine and reduces chest muscle activation.
✓ Fix: Focus on keeping the body straight from head to heels throughout the movement. Engage your abdominal and glute muscles to keep the hips stable.
❌ Elbows flaring out too much to the sides
Why it's wrong: When elbows are wide, too much pressure is placed on the shoulders, increasing the risk of injury and reducing effective loading of the chest muscles.
✓ Fix: Keep elbows slightly close to the body, at about a 45-degree angle. This directs the load better to the chest muscles and protects the shoulders.
❌ Performing too quickly or uncontrolled
Why it's wrong: Using momentum reduces muscle engagement and makes the movement less effective. It also increases the risk of injury.
✓ Fix: Perform the movement slowly and in a controlled manner, especially during the lowering phase. Focus on feeling the muscles and maximizing tension in each repetition.
Frequently asked questions
How does the decline push-up differ from a regular push-up?
In a decline push-up, the feet are elevated, changing the body's angle and targeting the load more intensely on the upper chest muscles. A regular push-up distributes the load more evenly across the entire chest, while the decline version simulates the benefits of an incline bench press without additional weights.
Can I do the movement if I don't have a bench?
Yes, you can use any stable and sturdy platform for your feet. For example, a sturdy chair, stairs, sofa, or even low cabinets work well. The important thing is that the platform is stable and does not move during the execution.
How often should I do decline push-ups?
It depends on your goals and your overall training program. For strength and muscle growth, 1-3 times a week is generally suitable. If training for endurance, you can do it more often. Remember to give your muscles enough time to recover.
How can I make the movement more challenging or easier?
You can make the movement more challenging by using a higher platform (increasing the load on the upper body) or performing repetitions more slowly. To make it easier, you can use a lower platform or perform push-ups with your knees on the ground, reducing the load.
Safety tips
- Warm up thoroughly before the workout by rotating shoulders and wrists and doing light push-ups.
- Ensure that the platform is stable and does not slip or tip over during the movement. Use a non-slip surface if possible.
- Keep your gaze on the ground as an extension of your body to maintain a neutral neck position and avoid overloading it.
- Listen to your body; if you feel sharp pain, stop the movement and check your technique or rest.
Tags
Train smarter with AI coaching
Tsemppi's AI gives you exact weights and reps for every workout. Progress every single session.
Start your free 7-day trial✨ Limited spots available • No credit card required