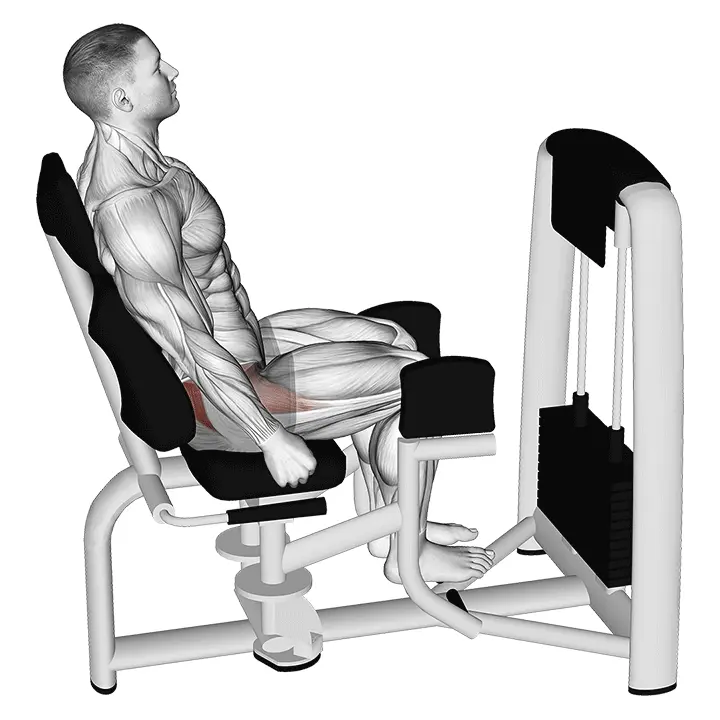
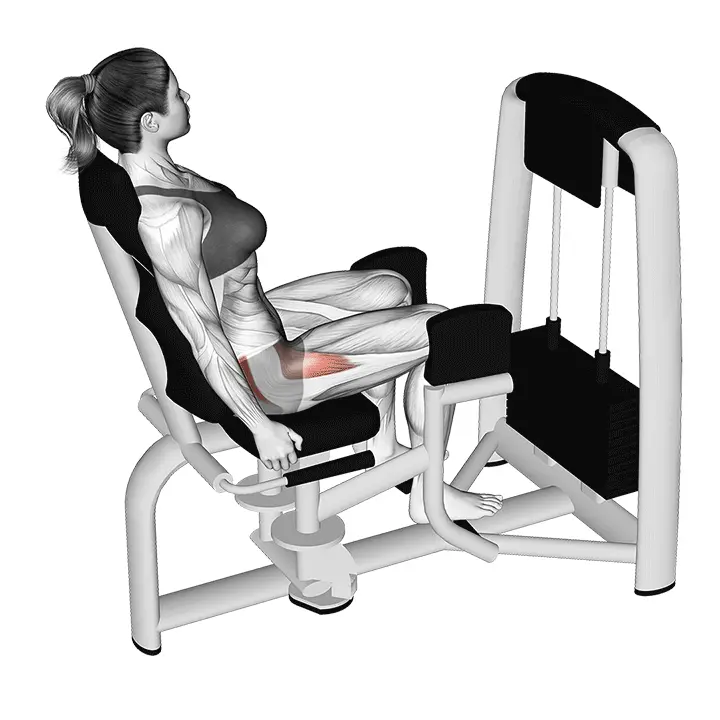
Lever Seated Hip Abduction
Seated hip abduction on the machine, where the position of the pelvis is corrected and the knees are aligned, activates the glutes and the outer thigh abductors. This movement helps improve hip control, reduce inward knee turning, and supports running and squatting techniques.
AI Analysis
Required equipment
Why Lever Seated Hip Abduction?
The seated hip abduction machine is an excellent foundational exercise for strengthening the glutes and the outer hip muscles, particularly the gluteus medius and minimus. This movement is specifically designed to isolate and activate these important muscles that are responsible for stabilizing the pelvis and lateral movements of the legs. Strong abductors are critical in many daily activities and sports, such as walking, running, and squatting. It helps activate 'lazy' glute muscles before other movements or serves as a standalone exercise to develop them. The movement is great for both beginners and more experienced fitness enthusiasts who want to improve hip control and prevent lower limb misalignments. Many people have weak middle and smaller parts of the glutes, which can lead to inward knee turning (valgus position) during squats or jumps. Regular abduction training helps correct this imbalance, strengthens the hip external rotators, and improves overall body biomechanics. Using the machine allows you to focus purely on muscle work without struggling with balance. This makes the movement a safe and effective way to build strength and endurance in the glutes. Whether you are aiming for better running technique, more stable squats, or just stronger glutes, seated hip abduction is a valuable addition to your workout program. An optional mini resistance band around the knees can enhance activation and help keep the knees aligned.
Benefits
Improves hip control and stability.
Effectively strengthens the glute muscles.
Reduces inward knee turning (valgus position).
Supports running and squatting techniques.
Prevents lower limb misalignments.
Increases hip mobility and strength.
Activates 'lazy' glute muscles.
Muscle groups
Primary
- gluteal9
- gluteal9
Secondary
- quadriceps3
- quadriceps3
- hamstring3
- hamstring3
Stabilizers
- adductors4
- adductors4
- abs5
- obliques4
- obliques4
- lower-back3
How to perform
Setup
- Adjust the backrest so that the lower back is supported and the knees are aligned with the hips (approximately 90° knee angle).
- Position the seat so that the thigh pads are above the knees and the starting position is a light stretch without pain.
- Sit upright: chest up, pelvis neutral, sides long. Keep your feet slightly externally rotated or neutral, with the entire foot supported on the footplate (if available on the machine).
Execution
- Lightly activate your core and squeeze your glutes before the movement.
- Press your thighs firmly outward until you feel a strong but controlled contraction in your glutes – avoid arching your lower back or tilting your pelvis.
- Hold the end position for 1-2 seconds, exhale and feel the movement in your glutes, not in your lower back or hip flexors (no pain). Return slowly while inhaling, maintaining knee alignment and avoiding weights clashing together. Repeat in a controlled manner for 8-15 repetitions.
Coaching cues
- •Gently pull your navel in and keep your pelvis neutral – do not let your lower back lift off the backrest.
- •Imagine moving from the tops of your thighs and glutes, not your knees; do not let your feet turn excessively inward/outward during the movement and keep the weight evenly distributed on the footplate (if applicable).
Common mistakes
❌ Too fast and uncontrolled movement
Why it's wrong: When the movement is done too quickly or with momentum, muscle work is replaced by movement momentum, causing effectiveness to diminish and increasing the risk of injury.
✓ Fix: Control the movement throughout the entire range, focus on muscle contraction during the abduction phase and a controlled return. Perform the movement slowly and deliberately.
❌ Pelvis tilting or back rounding
Why it's wrong: Attempting to use too much resistance or not focusing on posture control, causing the movement to not target the right muscles and unnecessarily straining the lower back.
✓ Fix: Keep your back in a neutral position and pelvis firmly on the bench. Reduce resistance if necessary and focus on maintaining good posture. You can use a small towel for support in the lower back.
❌ Knees turning inward during the return phase
Why it's wrong: Muscles are unable to control the movement during the return phase, which can weaken the effectiveness of the movement and add unnecessary strain to the knees.
✓ Fix: Control the movement in both directions. Return the legs slowly and in a controlled manner. If using a resistance band, it helps keep the knees aligned and resist inward turning.
Frequently asked questions
How often should I do hip abduction?
Generally, 2-3 times a week is a good amount to give the muscles enough stimulus to develop and time to recover. You can include it as part of your leg or full-body workout. As a beginner, you can start with two sessions and increase as needed.
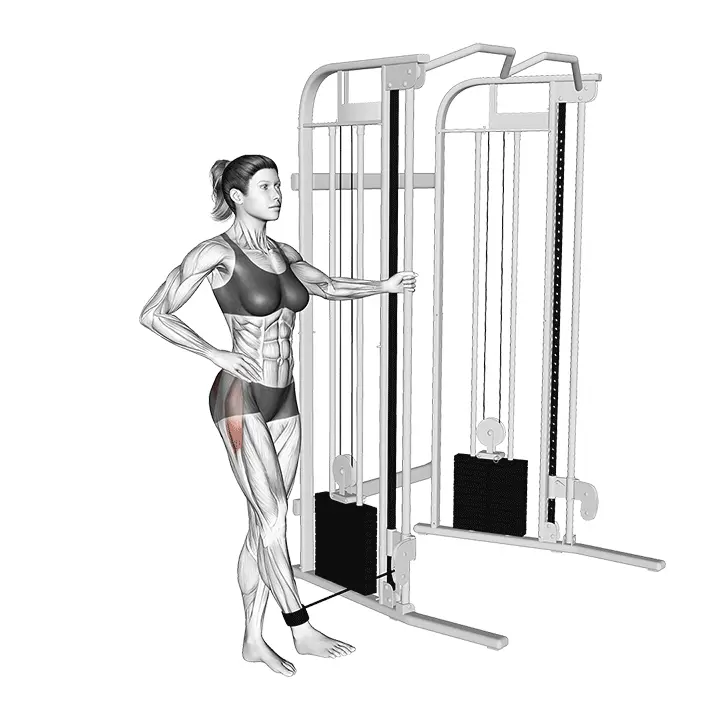
Can this movement be done without a machine?
Yes! Similar movements without a machine include side-lying leg raises or standing abductions with a resistance band. These require a bit more balance and coordination but effectively activate the same muscles.
Why do my knees turn inward when I squat?
Inward knee turning during squats is often due to weak middle glute muscles (gluteus medius), which are responsible for hip abduction and external rotation. The hip abduction machine helps strengthen these muscles, improving hip stability and helping keep the knees aligned with the toes during squats.
Should I always feel hip abduction in my glutes?
The movement should primarily be felt on the sides and upper parts of the glutes (gluteus medius and minimus) and slightly on the outer thigh. If you feel pain or strain in your lower back or hip flexors, check your position and technique. Ensure that your pelvis is firmly on the bench and your back is in a neutral position.
Safety tips
- Always adjust the machine to fit your body properly before starting the movement, ensuring a comfortable and stable position.
- Avoid using too much resistance that forces you to compensate or change your posture – this increases the risk of injury.
- Keep the movement controlled and avoid jerking or swinging; focus on a smooth and controlled execution.
- Do not exceed your natural range of motion; stop the movement if you feel pain or discomfort.
- Focus on feeling the right muscles and avoid unnecessary strain on the lower back by keeping your back straight and pelvis stable.
Tags

Train smarter with AI coaching
Tsemppi's AI gives you exact weights and reps for every workout. Progress every single session.
Start your free 7-day trial✨ Limited spots available • No credit card required