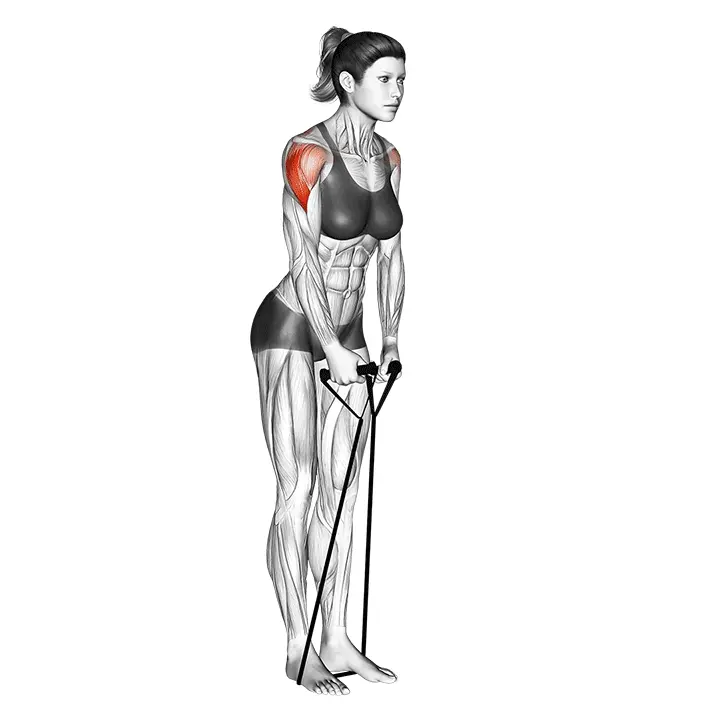
Band Lateral Raise
The side raise with a resistance band strengthens the middle part of the shoulders and improves shoulder joint control. The movement is suitable for both warming up and developing muscle growth with lighter loads and controlled technique.
AI Analysis
Required equipment
Why Band Lateral Raise?
The resistance band side raise is an excellent exercise that effectively targets the middle part of the shoulders, particularly the lateral head of the deltoid muscle. This not only shapes the shoulders to look more aesthetically pleasing but also supports the health and functionality of the shoulder joint. The movement significantly improves shoulder joint control and stability, which is critical in both everyday tasks and more complex athletic performances. It helps prevent pain conditions in the shoulder area and improves posture. For beginners, the resistance band side raise is an ideal way to start strengthening the shoulders, as the resistance of the band is progressive and provides a good feel for the correct technique. The band offers continuous tension throughout the range of motion, which helps activate the muscles more effectively and reduces the risk of injury compared to traditional dumbbells, especially when the technique is not yet fully refined. The movement is also an excellent choice for home workouts, as it requires only a light and easily transportable piece of equipment. The movement is versatile enough to be used for warming up the shoulders in preparation for upcoming workouts or as part of a dedicated muscle growth training regimen. With lighter resistance and controlled technique, it serves as an excellent activation exercise before heavier shoulder workouts or as part of recovery training. When the goal is muscle growth, choose a resistance band that provides sufficient resistance so that the last repetitions are challenging while maintaining clean technique. When done regularly, the resistance band side raise helps develop round and strong shoulders.
Benefits
Strengthens the middle part of the shoulders.
Improves shoulder joint control.
Develops round and aesthetic shoulders.
Supports better posture.
Prevents pain conditions in the shoulder area.
Increases shoulder joint stability.
Suitable for versatile warming up and muscle growth.
Muscle groups
Primary
- deltoids10
- deltoids10
Secondary
- trapezius5
- trapezius5
Stabilizers
- upper-back4
- upper-back4
- forearm3
- forearm3
- abs3
How to perform
Setup
- Stand with your feet hip-width apart and your core tight.
- Attach the resistance band under your feet or step on the band. Take a light grip on both ends with a neutral wrist.
- Keep your shoulders down and shoulder blades lightly tucked in. There should be a slight bend in the elbows.
Execution
- Raise your arms to the sides to about shoulder height, with the elbows leading the movement.
- Pause briefly at the top position while maintaining tension; do not lift your shoulders towards your ears.
- Lower your arms in a controlled manner, keeping the resistance steady throughout the range of motion. Repeat the desired number of repetitions.
Coaching cues
- •Keep your core active and your back neutral; avoid arching your back.
- •The movement starts from the shoulders – wrists and elbows stay aligned; do not throw the weight up quickly.
Common mistakes
❌ Too much resistance
Why it's wrong: If the resistance band is too tight, you will have to compensate with other muscles, such as the trapezius, which can lead to tension in the neck and shoulder area and reduce activation of the target muscle.
✓ Fix: Choose a lighter resistance band that allows you to perform the movement in a controlled manner and feel the burn in the shoulder, not in the neck.
❌ Jerking or performing the movement too quickly
Why it's wrong: A fast movement takes the power away from the target muscle and increases the risk of injury, especially due to the load on the shoulder joint. The muscle does not have time to work effectively.
✓ Fix: Perform the movement slowly and in a controlled manner, focusing on the muscle contraction and lowering. Let the resistance band control the movement, not the other way around.
❌ Hand rising too high
Why it's wrong: If the hand rises above shoulder level, the shoulder may rotate inward, increasing the risk of shoulder impingement. The trapezius muscles can also take on too much load.
✓ Fix: Stop the movement when the hand is about parallel to the ground or slightly below it. The elbow should be slightly bent and in line with the shoulder.
Frequently asked questions
How often should I do the resistance band side raise?
You can include the resistance band side raise in your workout program 2-4 times a week depending on your goals and other training. Those aiming for muscle growth may do it more often, while those focusing on endurance or warming up can do it almost daily with lighter resistance.
Can you really gain muscle with a resistance band?
Yes, absolutely! Resistance bands provide continuous tension throughout the range of motion, which is excellent for stimulating muscle growth. Choose a band with sufficient resistance and perform the repetitions in a controlled manner to create an effective muscle growth stimulus.
What resistance band should I choose?
Choose a resistance band that allows you to perform the desired number of repetitions with clean technique, but the last repetitions should be quite challenging. Start with a lighter resistance and gradually move to stronger bands as your strength level improves. The most important thing is to have a good feel for the target muscle.
Can the resistance band side raise be done seated?
Yes, the resistance band side raise can also be done seated. The seated position often helps isolate the shoulder muscles even better, as body movement or leg assistance is minimized. This can help focus entirely on the target muscle's work and technique.
Safety tips
- Keep the movement controlled and avoid jerking.
- Do not raise your arms above shoulder level.
- Focus on the feeling in the shoulder, not in the neck and shoulder area.
- Ensure the resistance band is intact and securely attached before each set.
- Listen to your body and stop if you feel sharp pain.
Tags
Train smarter with AI coaching
Tsemppi's AI gives you exact weights and reps for every workout. Progress every single session.
Start your free 7-day trial✨ Limited spots available • No credit card required