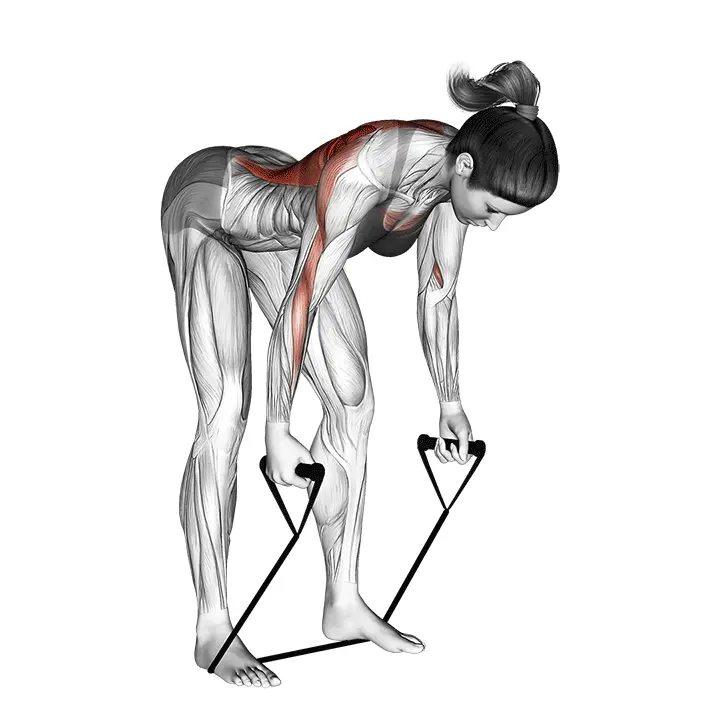
Band Bent Back Over Row
The resistance band bent-over row strengthens the upper back and scapular control. The movement particularly targets the scapular adductors and forearm grip strength, improving posture and back support.
AI Analysis
Required equipment
Why Band Bent Back Over Row?
The resistance band bent-over row is an excellent foundational exercise for strengthening the upper back and improving posture, suitable for anyone from beginners to experienced fitness enthusiasts. It is especially effective for home workouts, as you only need a resistance band and a small space. The movement specifically targets the scapular adductors, such as the middle and lower trapezius muscles and the rhomboids, which are key in maintaining good posture and shoulder stability. When these muscles are strong, they help pull the shoulders back and down, preventing forward-turned shoulders and a rounded upper back, which are common issues caused by sedentary work. The movement also effectively loads the forearm grip strength, which is beneficial for many daily activities and other strength training exercises. The unique resistance profile of the resistance band – with resistance increasing towards the end of the movement – helps activate the muscles effectively throughout the entire range of motion. This makes the band row a joint-friendly alternative to traditional rowing, and it is a great choice for warming up or recovery training. It is also a safe way to learn the basic movement pattern of rowing and activate the back muscles before heavier weight training. By incorporating this movement into your workout program, you support your back health, improve your posture, and increase overall functional strength.
Benefits
Effectively strengthens the upper back muscles.
Improves scapular control and stability.
Supports good posture and prevents a hunched position.
Develops forearm grip strength.
Prevents back pain by strengthening stabilizing muscles.
Facilitates lifting and pulling in daily activities.
Promotes shoulder health and mobility.
Muscle groups
Primary
- upper-back9
- upper-back9
Secondary
- biceps6
- biceps6
- trapezius7
- trapezius7
Stabilizers
- forearm5
- forearm5
- lower-back4
- deltoids3
- deltoids3
- abs3
How to perform
Setup
- Attach the band to a sturdy anchor at about knee-hip height or step on the middle of the band.
- Stand with your feet hip-width apart, with a slight bend in your knees and hinge at the hips at about a 30-45 degree angle, keeping your back neutral.
- Grab the ends of the band or handles with palms facing each other, shoulders down, and shoulder blades slightly back-down.
Execution
- Pull your elbows along your body towards your sides, squeezing your shoulder blades together at the end of the movement.
- Keep your chest open and core tight, pausing briefly at the top position.
- Return to the starting position in a controlled manner, extending your arms nearly straight without losing control of the shoulder blades. Repeat.
Coaching cues
- •Start the movement from the shoulder blades: pull your shoulder blades back and down before pulling your elbows.
- •Maintain a neutral back and weight centered on your feet; avoid rounding in the lower back and raising your shoulders to your ears.
- •Keep your wrist-elbow-upper arm aligned; avoid excessive jerking or overextending your back at the top position.
Common mistakes
❌ Rounding of the back
Why it's wrong: If the back rounds during the pull, the load shifts from the upper back to the lower back, which can cause strain and injury risk. The effectiveness of the movement for the upper back muscles decreases.
✓ Fix: Keep your back straight and your core lightly engaged throughout the movement. Focus on keeping your chest open and shoulders back.
❌ Pulling with the shoulders and neck
Why it's wrong: If you pull your shoulders up to your ears or feel tension in your neck, you are not optimally activating the upper back muscles. This can lead to shoulder and neck pain.
✓ Fix: Focus on pulling your shoulder blades together and down towards your spine. Imagine squeezing a pencil between your shoulder blades and keep your shoulders relaxed and down.
❌ Using a band that is too light or too strong
Why it's wrong: A band that is too light does not provide enough resistance to activate the muscles, while a band that is too strong can compromise technique and lead to compensation with other muscles.
✓ Fix: Choose a band that allows you to perform the desired number of repetitions with good technique, but still feels challenging and leads to muscle fatigue in the last repetitions.
Frequently asked questions
How often should I do the resistance band bent-over row?
You can include the movement in your workout program 2-4 times a week, depending on your overall training volume and recovery. Be sure to give your muscles enough time to recover between workouts, especially if you are also doing other back exercises.
Can this movement be done without a resistance band?
No, the resistance band is an essential part of this specific movement, as it provides resistance. If you want to do a bent-over row without a band, you can use dumbbells or a kettlebell, but that would be a different movement with a slightly different resistance profile.
How do I choose the right resistance band?
Start with a lighter band and focus on clean technique first. Once you can perform the desired number of repetitions with good technique and feel muscle fatigue in the last repetitions, it's time to move to a thicker or additional band.
What are the benefits of resistance band rowing compared to free weight rowing?
The resistance band provides ascending resistance, which is highest at the end of the pull, activating the muscles differently. It is also more joint-friendly and easier for beginners, as technique errors do not lead to injuries as easily as with heavy free weights. The resistance band is also portable and suitable for home workouts.
Safety tips
- Warm up the upper body and back thoroughly before starting the movement.
- Check the condition of the resistance band before use – do not use frayed or damaged bands.
- Keep your back straight and your core engaged throughout the movement to avoid straining the lower back.
- Control the movement in both directions; do not let the band pull your arms or body back down.
- Listen to your body and stop the movement immediately if you feel sharp pain at any point.
Tags
Train smarter with AI coaching
Tsemppi's AI gives you exact weights and reps for every workout. Progress every single session.
Start your free 7-day trial✨ Limited spots available • No credit card required